Friday, September 27, 2013

Easy Peazy Japanezy

Are you obsessed with those little fried, origami looking, cream cheese filled, chunks of heaven called Crab Rangoon??? Three for a dollar at Panda Express.  Yes, I will take twelve please.  Of course, they are on every Chinese buffet table I've ever been to.  We've made them several times at home and let me just say, you really have to love the ones you are cooking for, because they take some time.  As fast as our family eats them, well, let's just say it's gotta be love.  

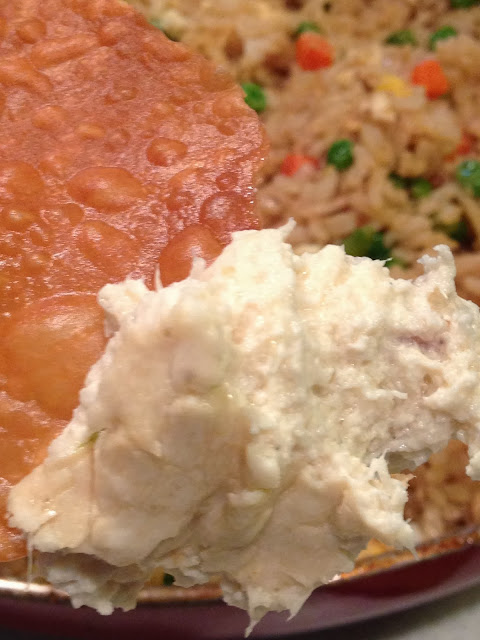
We have, thanks to the wonderful and magical Pinterest, found this week's Free Recipe Friday - Crab Rangoon DIP.  It is really a no brainer.  You take the filling of a crab rangoon, put it in a baking dish and bake.  But seriously, why oh why haven't we thought of this sooner!!!??!?  You then slice the lovely wonton/egg roll wrappers and fry them up into whatever size you like.  Voila.  It takes a bit of time to fry those things up because you really only need to fry six or eight at a time.  They are very thin but, the good news is they cook very, very quickly and it's easy peazy.  The filling gets baked and after it's removed from the oven, needs to rest for several minutes to come out of that lava hot stage.  In the mean time, fry up the wonton chips while the mixture bakes or even the day before.  My family seriously thinks these wonton chips should be sold on every chip aisle - big bags, snack size bags - you get the idea.  They are so light and crispy and the flavor is so great with all kinds of dips (even hot sauce) but, until manufacturers get on this, we will have to keep fryin' up our own!

WHAT YOU NEED:
8 oz pkg cream cheese, softened
1/2 cup sour cream (optional)
1 6 oz. can crab meat, drained
5 green onions, diced (optional)
1 tsp honey (optional)
1 tsp soy sauce (we used a bit more)
1 tsp worchestershire (we used a bit more)
1/2 tsp garlic powder
1/2 tsp sugar
1/2 tsp salt
1/4 tsp black pepper

You can tell by all of the 'optional' items above
this is a foolproof recipe, really.
Just keep tasting and tweaking it to your liking.

WHAT TO DO:
Preheat oven to 400.
Combine all ingredients in a medium size bowl
and mix until well blended and smooth.
Spray a 9x9 baking dish or a pie plate
with non stick spray.  Pour mixture in baking dish and bake for 15 minutes.

Remove from the oven when the edges are a bit golden
and the center is bubbly.
Cool a bit before diving in for the welfare of your mouth.

Fry up your sliced wontons in a large pot with 2-3 inches of veggie oil.
Gently drop a few wonton wrappers in and watch closely
toss and turn a bit and they will be done.
Drain on a wire rack and/or paper towels.
To serve, pour them up in a large basket and get ready for love.
If you won't eat them immediately,
let them completely cool and store in large freezer size baggies.
Ours got a little toastier than I would have liked,
but they tasted just fine! Mmm.
 This is how our family attacks this stuff.  Sooo good.
Serve it up with some homemade Chinese food
or make it just for snacking - either way
you'll have them begging for more!

Fortune cookie anyone???

ENJOY!!!!

Friday, September 20, 2013

PIZZA! PIZZA!

   Today's post is all about the greatest thing ever, pizza.  Now I know it's very easy to call in a pizza and go by and pick it up - and by all means I am NOT discouraging THAT.  We definitely treat ourselves to that quite often (we love our Pizza Boy).  However, from time to time, when we have a 'stay at home allll day' kind of day (those are the BEST) where no makeup or real clothes are required, we like to make a homemade pizza.  This pizza is Chicago style, thick crust, and once you've devoured some, will crave it from time to time.  That being said, I am opening up the archives to share this top secret recipe with you, my nearest and dearest :) but, seriously. . .this guy. . .I love cooking for him!

   Now back in the late 80's, Jeff Smith, my all time fav channel 13 cooking hero (before The Food Network even existed), revealed this amazing pizza recipe.  He even stated in his book, The Frugal Gourmet Cooks American, "Chicago has more pizza joints per capita than any other city in the world.  There are two thousand pizza parlors within the city limits of Chicago alone." So, what is the big deal about Chicago pizza???  Bear with me for a little history lesson.

    The Frug tells this story, "Following World War II, a local Chicago soldier returned to his city and to a job in a popular bar.  The owner wanted something new saying, "We have to feed these people to keep them coming in!"  The soldier, who had just returned from Italy, suggested pizza.  "It's bread with tomato on it and they give it away in Italy."  He began to experiment, and Chicago deep-dish pizzas were born.  Don't be confused by the fact that you can't buy this in Italy.  You never could.  This is a Chicago invention, and the bar where it was invented is called Pizzeria Uno."   

    Nobody in town can quite beat that basic recipe, though many other companies now are great competitors of Pizzeria Uno. Jeff Smith also says, "I have tried to figure out how it's done at Pizzeria Uno and I think that I'm very close.  I ran this recipe by Mama, a gorgeous black woman who has been cooking pizzas there for thirty years, she smiled and nodded.  I think it was a yes!"
   
     It is not layered as the pizzas purchased around here are - I'm thinking this is why we crave it.  Try out this dough when you have the time, you will love it.  The Frugal Gourmet says you should get up right now and make it!  But, if you don't have the time or are already in bed, purchase some frozen dough at the grocery store very soon or even from a pizza shop (yes, you can do that).  The point is, try layering your next homemade pizza this way - cheese on bottom instead of the top, and go for a thick crust sometime - you'll be glad you did. :)  This recipe is easy, you don't even have to really roll it out.  You just push it into place in the pan.  On a side note, Wilton cake pans are best for baking deep-dish pizza.

WHAT YOU NEED:
2 pkgs quick rise yeast
2 cups tepid water (too warm and it will kill the yeast)
1/2 cup vegetable oil
4 tablespoons olive oil
1/2 cup cornmeal
5 1/2 cups flour

FILLINGS/TOPPINGS FOR 9-10 INCH PIZZA:
1/2 lb (or more) sliced or shredded Mozzarella cheese
2 cups canned tomatoes, drained and squished
(we used petite diced - you can use sliced fresh as well)
1 teaspoon basil (we sometimes omit this)
1 teaspoon oregano (we don't care for it, we don't use)
2 cloves garlic, chopped
salt/pepper to taste
1/4 cup parmesan cheese (for topping)
3 tablespoons olive oil

OTHER OPTIONAL TOPPINGS
sliced pepperoni, mushrooms, bell peppers,
onions and/or olives - oh yes, olives!
And more, so much more...

WHAT TO DO:
In the bowl of your electric mixer - KitchenAid is easiest for this -
dissolve the yeast in water.
Add the oils, cornmeal, and 3 cups of the flour.
Beat for 10 minutes in the mixer (this is why a good mixer works best).
After mixing for 10 minutes, change to a dough hook
and mix in the remaining flour.  Knead in the machine
for several more minutes.  It's a bit tricky to do this by hand,
as the dough is rich and moist.

Pour out the dough on a clean countertop and cover with
a very large bowl.  Allow to rise until it has doubled.
Punch down and allow to rise again.
The second rising is usually much quicker.
And sometimes THIS happens.

In the mean time, prepare your toppings and pans.
Oil several round cake pans.
Put a bit of dough in each and push it out to the edges,
using your fingers.  Put in enough dough so that you can
run the crust right up the side of the pan,
making it about 1/8-1/4 inch thick throughout the pan.

Once the dough is smooshed into the pans,
place the cheese in tile like layers (if sliced)
or spread evenly (if shredded) right on top of the dough.
Next, put in the squished tomatoes on the cheese evenly.
Sprinkle with salt/pepper, garlic and herbs.
If you want to use any toppings place them on now.
Pepperoni, mushrooms, olives, etc.
When you're ready to bake, sprinkle on the parmesan cheese
and drizzle with olive oil.
Bake the pizza pie in a 450 degree oven until the top is golden
and the crust is a light golden - about 30 minutes.
This may take a little longer if you have several pans
in the oven at one time.
This pizza is so fantabulous I hope you will try it soon.
This is what happens when we make it.

ENJOY!

Friday, September 13, 2013

Friday Night Munch Time

Friday night madness has begun along with Monday night football, college football, Sunday games. . .oh where does it end???  If you want to whip up one of the easiest snacks around (other than dipping carrots in ranch dip - or are we the only fam that does that?!), you'll need to jot this Free Recipe Friday down!  Three ingredients.  That's all you'll need for this yummalicious snack food with a little bit of kick but, mild enough to eat the leftovers for breakfast (or are we the only fam that does THAT?!)  The pics aren't the greatest but, please give these a try.


WHAT YOU NEED:
6 whole eggs (we use large)
1/2 - 1 cup sliced pickled jalapenos (the ones in the jar)
2 cups grated cheddar (we use sharp)
salt and pepper

WHAT TO DO:
Preheat oven to 350.
Grab a 9x9 or 8x8 baking dish, either is fine.
Spray it with non stick spray and set aside.
Dice enough pickled jalapenos to cover the bottom of your dish.
You can make that layer thicker than mine and all will be well.
Cover the peppers with your shredded cheddar.
In a small bowl, whisk together the eggs and a pinch or two of salt/pepper.
Pour over cheese and using a fork,
wiggle the eggs around making sure they get thru that layer of cheese.
This recipe is very, VERY forgiving. 
You can easily add an extra egg or two if you want to stretch it. 
Don't you just love forgiving recipes???
Now, bake for 30 minutes.  Let cool just a bit before serving
(although they are great warm or cold)
and cut into small squares.

For something so delicious, it could not be more simple.
These are super great for game time snacks, parties and get-togethers
or just late night munchies!  Quick and easy and just as good the next day.

Whether you'll be enjoying concession stand goodness
or snack time at home,
ENJOY!

Friday, September 6, 2013

Chipotle Greatness

We've had a laugh or two in our house lately on the different ways we hear chipotle being pronounced.  Chi-poht-ley, chi-pohl-tay.  You'd think were all English majors or something ~ which could not be further from the truth.  We also get a kick from seeing misspelled words on signs and such.  We are truly pathetic, but it sure makes for some fun times here in East Texas.  However you pronounce chipotle, I'm pretty positive it will become a part of your daily conversation once you try this yummalicious condiment called chipotle mayo, the co-star of today's Free Recipe Friday.  It's great on a sandwich, a burger, eggs, hashbrowns, burritos, tacos, chips and anything else you wanna try.  So, get ready.

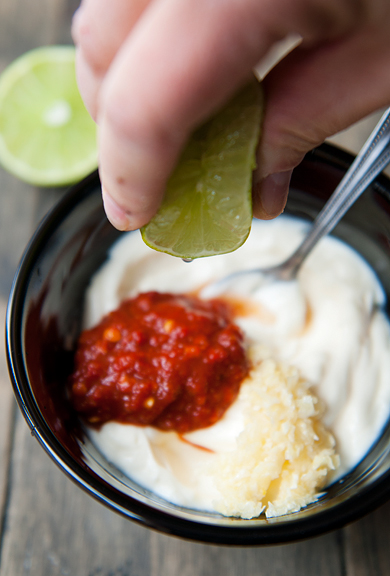
Our star of the show today though is a Mexican Breakfast Torta. This sandwich was an incredible find at the blog, Use Real Butter.  Jen is a great blogger with scrumptious recipes and photos.  Check it out HERE.  Not only will you find it to be the most amazing breakfast sandwich EVER, but the spicy chipotle mayo used will take you to far away lands and you'll want to forever keep a bottle of it handy in your fridge. We made the chipotle mayo strictly because the sandwich called for it, and after doing so, I made two more batches in one weeks time.  It is now a staple in our fridge.

WHAT YOU NEED:
(for the sandwich)
4 tortas (we used bolillo's)
1 cup refried beans, warmed
1/2 cup or more cojito cheese, crumbled/grated
(we used cheddar jack)
1 avocado, sliced
(we drizzled ours with a bit of lime juice)
12 oz pkg of sliced bacon, cooked
chipotle mayonnaise
4 eggs, fried, scrambled or your fav

(the chipotle mayo)
2-3 chipotle peppers in adobo sauce
2 cloves garlic, chopped
1/2 cup mayo
salt to taste
fresh lime juice to taste


(yummy photo by Jennifer Yu at Use Real Butter)

In a small food processor or Ninja (my fav)
combine chipotle peppers, garlic, salt and lime juice.
Pulse until smooth.
Add in mayo and mix until well incorporated.
Check for seasonings and store in a squeeze bottle
or jar and keep in the fridge.

Slice the torta or bolillo in half.
Toast or warm the bread.
Spread the warmed refried beans on half of each sandwich.
Sprinkle cheese on top of beans.
Divide avocado slices among each sandwich
and fan out.
Place a few slices of bacon on next and
drizzle with chipotle mayo.
Top with a fried egg cooked to your liking
or your other fav kind of egg and
cover with the other half of the bread slice.
Serve warm and maybe with a bit more chipotle mayo :)


(photos by Jennifer Yu at Use Real Butter)

A big thanks to Use Real Butter for introducing me
to my new breakfast fav!!!

Here's what ours looked like using bolillo's
(sort of like a smaller version of a baguette
whereas a torta is more similar to flatbread -
use whichever is easily available for you - either will be GREAT)
I could SO eat one of these almost everyday.

ENJOY!


Followers